Configure Advanced Settings: Drawings
Objective
To configure the advanced settings of your project's Drawings tool.
Background
If you're a Project Administrator, you may find it useful to customize a project's Drawings options by using the Drawings tool's advanced configuration settings. For example, you can control how revisions are ordered, add subscribers to your drawings so that they are automatically notified when the "current set" changes new revisions are uploaded, as well as control each user's permissions levels on the Drawing tool.
Things to Consider
- Required User Permissions:
- 'Admin' on the project's Drawings tool.
- Additional Information:
- Any changes to the Drawings settings will be project-wide.
Video
Steps
-
Click the Configure settings
 icon.
icon. -
When you make changes to each of the sub-tabs, click Update at the bottom of the page to save your settings.
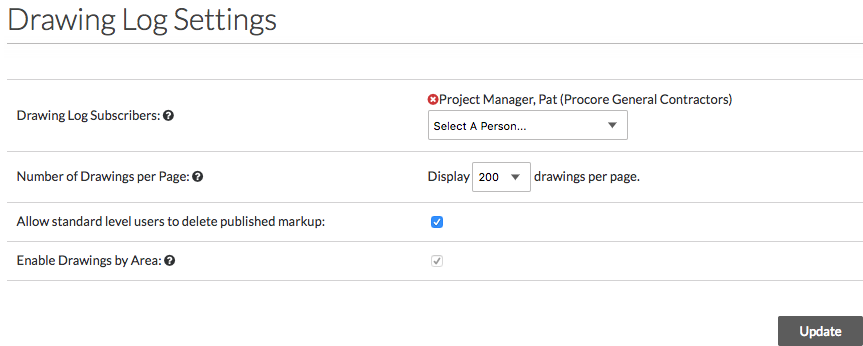
Drawing Log Settings
- In General Settings, you can edit how your drawings are seen in the Drawings log, add or delete subscribers to your drawings, and edit information about your drawing sets.

- Drawing Log Subscribers: Add or delete users who should be subscribed to your Drawings page. This will send subscribed users email updates whenever a new drawing is uploaded to any set.
Note: If you add a group to the drawing log subscribers, any additions or subtractions to the group will not be reflected in this list. For example, if you add a person to an "Internal" group in the Directory, that person will not be added to the drawing log subscribers to reflect the group change. See Subscribe to the Drawings Log. - Number of Drawings per Page: Select how many drawings will appear on your Drawings Log page. Selecting a lower number will result in faster page load times of the Drawing Log's list page.
Note: This setting does not apply to the Procore mobile application. - Allow Standard Level Users to Delete Published Markup: Mark this checkbox if you would like users with 'Standard' level access to the Drawings tool to be able to delete any published markups. See Allow Users To Delete Published Markups.
- Enable Drawings By Area: Mark the checkbox to enable drawings by area on your project. See the following articles for more information.
- Drawing Log Subscribers: Add or delete users who should be subscribed to your Drawings page. This will send subscribed users email updates whenever a new drawing is uploaded to any set.
Connected Project
Select who should receive notifications when new drawings are copied from an upstream project and are ready to review and publish to your downstream project.
Note: This section only shows for the downstream project after the projects have been connected.
- Under, 'Administrative Email Recipients,' select who should receive notifications when new drawings are copied from an upstream project and are ready to review and publish to your downstream project.
- All Drawings Admin Users
- Specific Users (in your Project Directory)
- Enter and select the specific users' names.
Edit Drawing Sets
- Edit Drawing Sets by clicking into the fields under Set Name and Set Date.
- Delete sets by clicking the red 'x' across from the set.
Note: Sets with drawings in them cannot be deleted; you must first delete all drawings in the set before you can delete the corresponding drawing set. See Delete Drawings. - For more information on your options in this section, see Edit a Drawing Set.
Edit Drawing Disciplines
- Edit the names of discipline names by clicking into the fields under Discipline Name. See Rename Drawing Disciplines.
- Click the more menu (≡) to drag-and-drop the drawing disciplines to a different order. This will affect how drawings are arranged on the Drawings list page. See Move Drawing Disciplines.
- Delete disciplines by clicking the red 'x' across from the discipline.
Note: Disciplines that have drawings in them cannot be deleted; you must first delete all drawings in the discipline before you can delete the corresponding drawing discipline. See Delete Drawings. - Click on the Discipline Abbreviation Setup page to configure abbreviations for drawing disciplines. You can also add new disciplines here. For information on configuring custom disciplines for automatic recognition when uploading new drawings, see Configure Default Disciplines.
Permissions Table
- Click on Permissions Table sub tab to manage user permissions of the Drawings tool.
Tip! For a full list of actions users can perform in the Drawings tool, see the Permissions Matrix. - Set each user's permission for the Drawings tool according to your preferences.
- The checkmark icon
 indicates the permission level assigned to the user. For example, in the screenshot below, the user has 'Standard' permissions on the Drawings tool.

- The checkmark icon

