Add a Revision to a Budget in Portfolio Financials
Objective
To add a revision to a project's budget in Portfolio Financials.
Background
The Budget tab within the Cost Tracker allows you to build project budgets with variances and anticipated costs. There are two different budgeting methods that you can use in Portfolio Financials: a broken down budget, which will allow you to assign budgets to individual cost items through the Cost Tracker and an overall (lump sum) budget, where you have one amount for the entire project. If you start with overall budget, you can choose to break it down later. However, if you start with a broken down budget, you will not be able to go back to an overall budget.
Things to Consider
- Required User Permissions:
- 'Full Access' to the project or higher.
- Additional Information:
- You cannot add a budget revision if there is currently a draft revision. You can either edit the existing revision on the Budget tab, or choose to discard it.
- If you want to enter budget values by cost per square foot, a square footage value must exist for the project.
Steps
Follow the relevant steps below dependent on your budget type:
To add a revision to an overall project budget:
- Navigate to the Cost Tracker section of the Project Page.
- Click the vertical ellipsis
 icon on the Budget column and select Add Budget Revision.
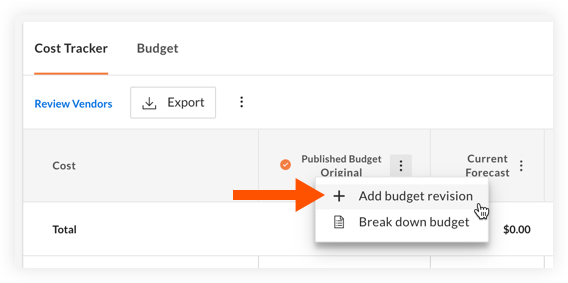
- Enter a Name, Value, and a Description (optional) for the revised budget.
- Click Submit.
To add a revision to a broken down budget:
Note: There must be a published budget for the project in order to add a revision.
- Navigate to the Cost Tracker section of the Project Page.
- Click the Budget tab.
- Click Add Revision.

- Enter a Name and Description (optional) for the revised budget.
- Click Continue.
- New Draft columns appear on the budget. When you hover over a cell in these columns, a pencil
 icon is shown for a value that can be edited, and a plus
  icon is shown if a value has not been added yet.
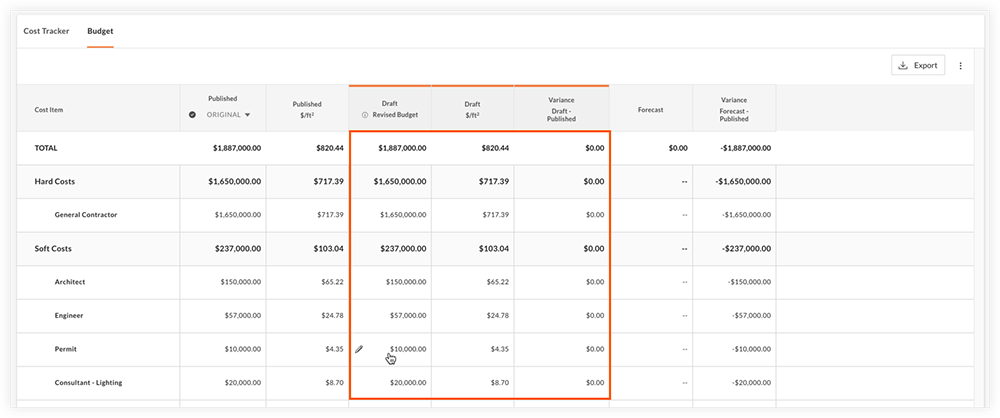
- Click into cells to enter revised amounts as needed. You can enter cost item budgets in terms of gross dollar amount, cost per square foot or variance (calculated as current draft budget minus (-) published budget).
- When you are finished making revisions and are ready to submit the changes, click Submit.
Note: If you do not want to save this budget revision, you can click Discard. - Click Publish to publish the budget revision, which will automatically appear on the Cost Tracker.
Note: You cannot edit a budget revision after publishing.