Add a Multi-Tiered Location to an Item
Objective
To add a multi-tiered location to an item within the create or edit page of an item (e.g. submittal, RFI, change order, etc.).
Background
If your Project Administrator has enabled this functionality on the project, you may be able to add multi-tiered locations "on the fly." This means that when adding a location to an item, you will be able to create a new one from within the item's edit or create page to add to the master list of project locations.
Things to Consider
- Required User Permissions:
- Varies by tool and by task. Check the User Permissions Matrix to see what permissions you need to create or edit items on the supported tools.
Note: Users with the appropriate permission can also add a location using the Project level Admin tool. See Add Tiered Locations to a Project.
- Varies by tool and by task. Check the User Permissions Matrix to see what permissions you need to create or edit items on the supported tools.
- Supported Procore Tools:
- Additional Information:
- Even if you have permissions to edit or create an item in the above list, your project manager may have turned off the ability to add new locations on the fly. If this is the case, you will not see the orange "Add New Location" button when you go to add a location.
- A location can have a virtually unlimited number of tiers.
- Duplicate location names are not permitted.
- Locations are created on a per-project basis.
Steps
- Navigate to one of the supported tools.
Note: See Things to Consider above for a list of tools that support creating new locations. - Click the Edit button next to the item you wish to add a multi-tiered location to or create a new item on that tool. (Note: Instructions on how to create and edit are available by searching for "Create a ____" or "Edit a ____" in the search bar at the top of this page.)
- Select the drop-down menu next to "Location."
- Use the type-ahead search bar to find the location you wish to add to the item, or add a new location.

Add a New Location
You can add a brand new multi-tiered location or you can add a new sub location to an existing multi-tiered location.
Add a new multi-tiered location
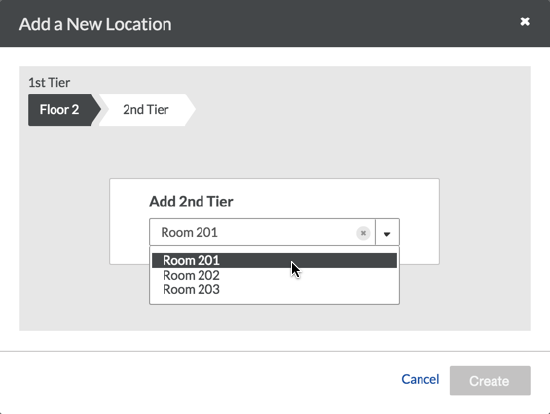
- Type in the name of your first tier location. (Note: See What are multi-tiered locations? The first tier location will be the parent location to your sub locations, and should be the most broad. For example, in the list in the image above, we could add "Floor 3".)
- If the 1st tier location already exists, you will be prompted to add the existing location; if the location doesn't exist, click + Add [location name].
- Type the name of your second tier location. (Note: The second tier locations will be a sub location to the first tier location, and it should refer to a location inside of the 1st tier. For example, you could add "Room 301" to "Floor 3").
- Click +Add [location name] the green checkmark.

- Add as many sub locations as needed to apply to the location of the item. (Note: It is recommended that you follow the best practices for adding locations that your company has set up.)
At any point in this process, you may delete a tier and all of its sub tiers by hovering your mouse over the breadcrumbs and clicking the X to delete the location and all of its sub locations. If the location or sub location already existed in Procore before opening this multi-tier location picker, it will not delete it permanently).
- Click Create when you're done adding the multi-tiered location to the item. (Note: The item will automatically be placed in the location field of the item).
- Click Update or Create at the bottom of the page to save the location to the project.
Add a new tier to an existing location

- Select the first tier location you wish to add a sub location to or use the type-ahead menu to find the first tier location you would like to add a sub location to.
- Follow the location tier path in a similar way until you reach the tier you wish to add a new sub location to.
- Type the name of your sub location.
- Click +Add [location name] the green checkmark.
- Click Create when you're done adding the multi-tiered location to the item. (Note: The Create button will not be selectable unless you create a new sub location. Once you click Create, the new location will automatically be placed in the location field of the item).
- Click Update or Create at the bottom of the page to save the location to the project.