Create a Commitment Potential Change Order from a Change Event
Objective
To create a potential change order for a commitment from a change event.
Background
Your project's change order tier configuration settings determines if you need to create a potential change order for a commitment:
- 1-Tier Change Orders. You don't need to create a potential change order and can skip the Steps below. Instead, you simply create a commitment change order. For instructions, see Create a Commitment Change Order or Create a Commitment Change Order as a Collaborator.
- 2-Tier Change Orders. First, Create a Change Event. Then, use the Steps below to create a potential change order for your commitment from the change event.
Note
If your project is using the optional Request for Quote (RFQ) feature in the Change Events tool, you can create the potential change order either before or after the RFQ has a response. However, if you wait until the RFQ has been reviewed and placed into the Pending Final Approval status, Procore will automatically populate the potential change order's Schedule of Values (SOV) with the RFQ amount. To learn more, see What are the different RFQ statuses and how do they affect cost and change order amounts?Things to Consider
- Required User Permissions:
- 'Admin' level permissions on the project's Commitments tool.
OR - 'Standard' level permissions on the project's Commitments tool and added to the 'Private' drop-down list and the 'Allow Standard Level Users to Create PCOs' configuration must be selected.
- 'Admin' level permissions on the project's Commitments tool.
- Requirements:
- The Change Events tool must be enabled on the project. See Can I enable the Change Events tool on my existing project? and Add and Remove Project Tools.
- The Commitments tool must be configured for two-tier change orders. See What are the different change order tier settings in Project Financials? and Configure the Number of Prime Contract Change Order Tiers.
- Additional Information:
- After you create a change event, you have the option to create a RFQ. See Create RFQs.
- On commitments, potential change orders can be transitioned into change orders.
Prerequisites
- Complete the steps in Create a Change Event.
- Optional: Complete the steps in Create RFQs from a Change Event.
Steps
- Navigate to the project's Change Events tool.
- Click the Detail tab.
- Place a checkmark next to the change event line items to add to the potential change order.
Notes
- To show only line items for a specific vendor, click Add Filter and then choose Vendor from the drop-down list.
- You can select multiple line items from multiple change events.
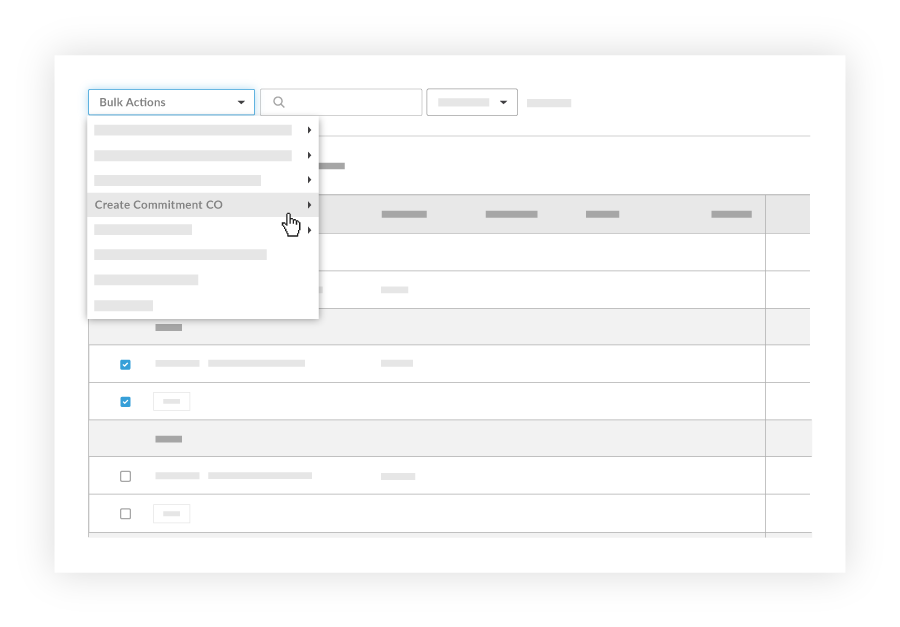
- Click Bulk Actions and choose one of these options:
- Create a Commitment PCO > Contracts with Matching Cost Codes
If there are contracts with cost codes that match the change event line items you select, they will appear here for your selection.
OR - Create a Commitment PCO > Contracts
All other approved contracts will appear here for your selection.
Note: If an option is grayed out and dimmed, hover your mouse cursor over the tooltip to learn why.
- Create a Commitment PCO > Contracts with Matching Cost Codes
- Under General Information in the New Potential Change Order page, enter the following information:
- Number
Procore automatically assigns the next available number to the potential change order. By default numbers are assigned as 001, 002, 002, and so on.Tip
- You can manually override this by typing over the number if desired. For example, you might want your numbering scheme to use three (3) leading zeros instead of two (2): 0001
- If you override the default number, Procore automatically increments the numbering using your new entry and format.
- Date Created
This field logs the date and time the potential change order was created. - Revision
When you first create a potential change order, the revision number is zero.
Note: Later in the project, a potential change order might have several revisions because of feedback from a reviewer/approver. - Created By
This field automatically displays the name of the user creating the potential change order. - Contract Company
This field automatically populates with the name of the subcontractor or vendor listed on the subcontract.
Note: This field is only visible if the potential change order is for a subcontract. - Contract
This field automatically populates with the name of the contract for which the potential change order is being created.
Note: This field is only visible if the potential change order is for a subcontract. - Title
Enter a title name for the potential change order that describes what the change order is for.Note
Before exporting the potential change order to an integrated ERP system, keep in mind that there may be character limitations. See What is the maximum character length for a commitment's 'Title'? - Commitment Change Order
- Status
Select the current state of the potential change order. Procore's default status is Pending-In Review. To learn more, see What are the default statuses for change orders in Procore? - Field Order
- Change Order Request
- None. This is the default setting. You can link the potential change order to a change order request at a later time.
- Add to Existing. Choose this option. Then select an existing change order request from the drop-down list.
- Create New. Choose this option to create a new change order request.
Note: You also have the option to create a new commitment change order by placing a checkmark in the Also Create New Commitment Change Order box.
- Change Reason
The change reason field will populate with the change reason you selected in the change event; however, you can edit as necessary. Select one of these reasons for the potential change order: Client Request, Design Development, Allowance, Existing Condition, or Backcharge. To learn how to configure change reasons, see Set the Default Change Management Configurations. - Private
Check this box so only you and users with 'Admin' level access on change order can view this change order. - Description
Enter a detailed description of the commitment potential change order.
Note: If you will be exporting the commitment potential change order to an integrated ERP system, there may be character limitations imposed by the third-party system. - Request Received From
Select a user from the project's directory who you are submitting the commitment potential change order on the behalf of. - Location
Use the location drop-down menu to select a location the [item] impacts. Either select from the predefined locations or see How do I add a multi-tiered location to an item?. This location may be as general as the site location at the first tier or as specific as where on the site the contractor will be working at the second tier. - Schedule Impact
If known, enter an approximate number of additional days that the proposed change would add to the project's current schedule. - Field Change
Mark this checkbox if the commitment potential change order requires a field change - Reference
Reference any other tools, materials, or documents that are related to the commitment potential change order. - Paid in Full
Mark this checkbox if the cost is already covered in the budget. - Change Event Line Items
If the project is syncing its data with an integrated ERP system, select a line item from the Associated Line Item drop-down menu. If you select New Line Item, a zero (0) dollar line item will be added to the commitment's SOV. - If the project is not syncing data with an integrated ERP system, continue to the next step.
- Number
- Click Create.
Procore creates the potential change order's SOV using the change event line items.PROCORE SUPPORT: INTERNAL NOTES
If the 'Create' button is labeled 'Create and Save SOV', the Procore company account holder has configured Procore to allow project collaborators to submit change orders. For details, see Allow Collaborators to Submit Field-Initiated Change Orders (Beta).
See Also
If you would like to learn more about Procore's change events management software and how it can help your business, please visit our construction change order product page  .
.