Procore

Add a User Account to the Project Directory

Also available on  ios-gray-icon.jpg  android-gray-icon.jpg

Objective

To add a user to the Project level Directory tool.

Background

In Procore, a user is a person who has a profile set up in a Procore Directory. Procore identifies unique users by their login email address. Because of this, the same login email address can't be used for more than one user profile in a company's Directory.

Users can be added to a company's Procore account in the Company level Directory tool or in the Project level Directory tool. This tutorial explains how to add users in the Project level Directory tool.

Things to Consider

Steps

To add a user record to Procore, complete the tasks below:

Add a User

  1. Navigate to the Project level Directory tool.
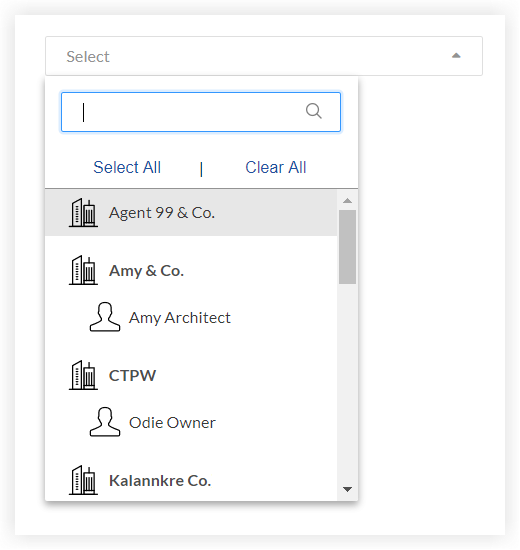
  2. Click Add User.
  3. Recommended: Search Procore to see if the user already exists as follows:
    1. Typing the user's company name under Advanced.
    2. If a match exists, select the user's name to automatically fill in the fields. Then skip to step 5.
      OR
    3. If a match does NOT exist, continue with the step 4.
  4. Complete the form:
    1. First Name. Enter the new user's first name. 
    2. Last Name. Enter the new user's last name. 
    3. Email Address. Enter the new user's email address. This will be the email that they use to log in to Procore. In order to add the record, the email address entry must use the proper format (e.g., jsmith@example.com). 
    4. Permission Template. Select one of these options from the drop-down list:
      Note: We recommend selecting either a global permission template or a project specific permission template. To learn more about permission templates, see Manage Project Permissions Templates.
      • Apply a Permission Template Later: Select this option to define the user's permissions later. If you select this option and a permissions template is not applied, users with 'Admin' level permissions on the Project level Directory tool can adjust this user's permissions in the configuration settings pages for individual tools.
        OR
      • Global Permission Template: To provide the user with the project access permissions defined in one of your company's global permission templates, select a template under the 'Global Permission Templates' section.
        OR
      • Project Specific Permission Template: To provide the user with project access permissions defined in one of the project specific permission templates on the project, select a template under the 'Project Specific Templates' section.
    5. Optional: Search for the user's company, then select the company.
    6. Optional: Select whether the user is an employee of your company. 
  5. Click Add.
    A green banner displays to confirm the user was added to the project and you are redirected to their profile in the Project level Directory where you can update their company information, personal information and other project settings as described below.

Update the User's Company Information

Depending on your permissions, there are two (2) options for updating a user's company information:

Option 1: Search for a Company Match

  1. Click the Company Name drop-down list. 
  2. Type the company name in the Search box.
  3. Select the matching company from the results.

Option 2: Create a New Company

Only users with 'Admin' level permissions on the Project level Directory tool OR 'Read Only' or 'Standard' level permissions on the Project level Directory tool with the 'Create and Edit Companies' granular permission enabled on their permissions template can perform this task.

 Caution
When adding a new company to a project, we recommend that you pay close attention to how existing vendor/company records are spelled across all your company's Procore projects (e.g., 'ABC Concrete' vs 'ABC Concrete LLC').  Any unique data entry for the Company Name can result in the presence of two (2) or more unique records for a single entity in the Company Directory. To learn more, see What happens if I have duplicate entries in the Procore Company Directory?
  1. Click the Company Name drop-down list. 
  2. Click Create New.
  3. Enter the following information:
    1. Company Name. This is a required field. Type the full name of the company in the box. 
    2. DBA. Enter the company's Doing Business As name. 
    3. Business Phone. Enter the company's business telephone number. 
    4. Fax. Enter the company's business facsimile number. 
    5. City. Enter the company's city. 
    6. Postal Code. Enter the company's postal code. 
    7. Country. Select the company's country from the list. 
    8. Province. Select the company's province from the list. 
  4. Click Create

Update the User's Contact Information

Click Copy to Personal Information under 'Company Information' if the user's contact information is the same as the company's contact information.

If different from the company information that you entered above, modify the user's contact information as follows:

  • Address. If the user works in a location that is different than the company address, update the user's address here. 
  • City. Type the name of the city associated with the user's address. 
  • Province. Select the desired province from the drop-down list. 
  • City. Select the desired city from the drop-down list. 
  • Postal Code. Enter the postal code in the text box. 
  • Business Phone. Enter the user's business phone number. 
  • Business Fax. Enter the user's fax number. 
  • Cell Phone. Enter the user's mobile telephone number. 
  • Job Title. Enter the user's job title. 
  • Project Roles. Select the user's role on the project. To create these options, see Add Custom Project Roles
  • Tags/Keywords. Enter any tags and keywords to make searching for the user in the Project Directory easier. For example, if they specialize in Best Value Source Selection (BVSS), you might want to enter the acronym BVSS. This is a free-text field, so you can create your own tag/keyword classification system to meet your organization's specific needs. 
  • Admin Only: The following fields can only be viewed and updated by users with 'Admin' level permissions on the Project level Directory tool.
    • Active? This setting can only be changed in the Company Directory.
    • Classification. Select a classification from the drop-down list. To learn which Procore tools interact with classifications, see Which Procore tools support 'Classifications'?
    • Send This User Messages. Select Via Email or Not at All from the drop-down menu. If you will be designating this user as an invoice contact, select Via Email to ensure that any invoice-related messages are sent. For details, see What is an invoice contact?
    • Is Employee Of ?. Place a checkmark if the user is an employee of your company. Leave the checkmark blank if the user is employed by another business entity. 
    • Is an Insurance Manager of . If this user is also your company's Insurance Manager, place a checkmark in this box. To learn more, see Designate an Insurance Manager for Your Procore Company.
    • Attachments. Click Attach File(s) or use a drag-and-drop operation to move file from a computer or network location into Procore. 

Update the User's Project Permissions

Only users with 'Admin' level permissions on the Project level Directory tool OR 'Read Only' or 'Standard' level permissions on the Project level Directory tool with the 'Manage Permission Templates (Assignable Only)' granular permission enabled on their permissions template can perform this task. See What is an assignable permissions template?

  1. Under Project Permissions Templates, the template that you applied to the user's account above is selected in the drop-down list. 
    Note:  After applying a permission template to a user's account, the user's permissions can only be modified by editing their permission template in the company's Permissions tool. See Edit a Project Permissions Template.
  2. Change the user's permissions by selecting one of these options from the Project Permissions Template drop-down list:
    Note: We recommend selecting either a global permission template or a project specific permission template. To learn more about permission templates, see Manage Project Permissions Templates.
    • Do Not Apply a Permission Template. If you want to create customized permissions for the project user, select this option. In the table below the 'Project Permissions Templates' drop-down menu, click the button on each permission level you want to provide for each tool you want the user to have access to.
      OR
    • Global Permission Template. To provide the user with the project access permissions defined in one of your company's global permission templates, select a template under the 'Global Permission Templates' section of the drop-down menu.
      OR
    • Project Specific Permission Template: To provide the user with project access permissions defined in one of the project specific permission templates on the project, select a template under the 'Project Specific Templates' section of the drop-down menu.

Add the User to the Project's Distribution Groups

Only users with 'Admin' level permissions on the Project level Directory tool can perform this task.

If your company or project contains any distribution groups, those groups will appear in the appropriate area:

Set the User's Default Email Notifications

Only users with 'Admin' level permissions on the Project level Directory can perform this task.

Many Procore tools are designed to send automated notifications to end users. For example, to notify the responsible contractor when their input is required or to notify stakeholders when a project due date is pending or an item is overdue. Automated notifications can also be sent to keep members of a distribution group in the communication loop. 

  1. Under Default Email Notifications, mark one or more of the following checkboxes:
    • Emails (by default). Includes the user as a recipient on notifications distributed from the Emails tool. 
    • RFIs (by default). Includes the user as a recipient on notifications distributed from the RFIs tool.
    • Submittals (by default). Includes the user as a recipient on notifications distributed from the Submittals tool.
    • Deficiency List items (by default). Includes the user as a recipient on notifications distributed from the Deficiency List tool.
    • Weather Delay (via email). Includes the user on notifications about project weather delays.
    • Weather Delay (via phone). Includes the user on telephone notifications about project weather delays.
      Note: To learn more about weather delay notifications, see Enable Weather Delay Alerts by Phone or Email.
    • Observations (by default). Includes the user on notifications distributed from the Observations tool.
    • Incidents (by default). Includes the user on notifications distributed from the Incidents tool. 
    • Delay Log (by default). Includes the user on notifications distributed from the Daily Log tool's Delay Log. 

Set the User's Schedule Notifications

Only users with 'Admin' level permissions on the Project level Directory can perform this task.

The Schedule tool must be active on the project, for the Schedule Notifications area to appear. Some feature require Microsoft Project. For details, see Integrate a Microsoft Project Schedule using Procore Drive.

To set notifications, mark one or more of the following checkboxes:

  • All Project Tasks (Weekly). Mark this checkbox to notify the user about future tasks that have been added to the project schedule (a.k.a., "schedule tasks"). 
  • Resource Tasks Assigned To. Mark this checkbox to notify the user about any resource tasks assignments. 
  • Upon Schedule Changes. Mark this checkbox to notify the user about changes to the project schedule. 
  • Upon Schedule Changes Requests. Mark this checkbox to notify the user when a change request is made to the project schedule. 
  • Instructions (by default). Mark this checkbox to notify the user with an instruction is added to the project. 

Save the User's Record

Depending on whether the account is new or existing, click one of the following buttons:

  • Click Save and Send Invitation when:
    • You want to invite the new user to join your project. 
    • The user has NOT previously logged into Procore. 
       
  • Click Save & Send Notification when:
    • You want to notify an existing user of a change. 
    • The user has previously logged into Procore. 
       
  • Click Save when:
    • You want to save the new user account.
    • You are NOT ready to send the user an invitation to join Procore.