Configure Settings: Change Events
Objective
To configure advanced settings for the project's Change Events tool.
Background
If you have been granted the appropriate permissions, you can configure a variety of advanced settings for the project's Change Events tool.
Things to Consider
- Required User Permissions:
- 'Admin' level permissions on the project's Change Events tool.
- Additional Information:
- To learn more about the columns displaying in the Change Events tool, see these links:
- To enable the 'Sub Jobs' column, see Enable Sub Jobs on Projects for WBS.
- To enable the 'Production Qty' and 'Production UOM' columns, see Enable the Labor Productivity Cost Features for Project Financials.
- To enable the 'Non-Commitments' column, see How do I track non-commitment costs on a change event?
- For more information, see How do the Change Events tool's column display settings work?
- To learn more about the columns displaying in the Change Events tool, see these links:
Prerequisites
- Review this FAQ. See Can I enable the Change Events tool on my existing project?
- Add the Change Events tool to the project. See Add and Remove Project Tools
Steps
Follow these steps in these tasks to configure the settings for the Change Events tool:
- Enable and Disable the Column Display
- Maintain Budget Codes Across All Line Items in Sync
- Allow Line Item auto-population of Budget Code, Vendor, and Contracts
- Add Estimated Markup to All of the Change Events on a Project
- Set Attachment Settings
Configure the Budget ROM Settings - Prevent Budget Changes and Potential Change Orders on the Same Change Event Line Item
- Set User Permissions
Configure Latest Cost or Latest Price Change Order Creation
To configure this setting, enable the Change Orders tool. See Enable the Change Orders Tool.
- Navigate to the project's Change Events tool.
- Click Configure Settings
 .
. - Under Change Orders, choose an option to define how Procore creates Commitment Change Orders:
- To consistently track line item cost, mark the Always Create Commitment Change Orders Using Latest Cost check box. This ensures new commitment change orders track the latest costs on the line item, even if potential change orders exist.
OR - To consistently track line item revenue, leave this check box blank. This ensures the latest price of the line item and potential change order are passed to the commitment change order.
- To consistently track line item cost, mark the Always Create Commitment Change Orders Using Latest Cost check box. This ensures new commitment change orders track the latest costs on the line item, even if potential change orders exist.
Enable and Disable the Column Display
- Navigate to the project's Change Events tool.
- Click Configure Settings .
- Choose from these options to show or hide columns in the Change Events tool.
Note: The system turns all column displays on, by default. You can disable these columns by removing the checkmark. For a complete list of column's these settings affect, see How do the Change Event tool's column display settings work?- Display Revenue ROM, Latest Price, Latest Cost and Over/Under Columns
This checkbox turns the Revenue ROM columns ON and OFF. The default setting on new Procore projects is ON.- To enable the columns, place a checkmark in this checkbox.
- To disable the columns, remove the checkmark from this box.
Important
- If you choose to disable these columns from the Change Events tool, the 'Revenue ROM' column continues to be available in prime contract change orders. To learn more about the Revenue ROM columns, see Add Financial Markup Lines with Revenue ROM to Change Events.
- If you create a change event (see Create a Change Event) and select 'TBD' or 'In Scope' from the change event's Scope drop-down list, the 'Revenue ROM' field in the prime contract change order shows $0. If you choose 'Out of Scope,' the field shows the latest cost.
- Display UOM, Revenue Qty, Revenue Unit Cost, ROM Unit Qty, and ROM Unit Cost Columns
This checkbox turns the unit-based columns ON and OFF in the view page of a change event. The default setting for this checkbox is OFF.- To enable the columns, place a checkmark in this box.
- To disable the columns, remove the checkmark from this box.
Notes
- Removing the setting does NOT disable the columns when creating a change event. They are only hidden when viewing a change event.
- If your company is going to be creating change events from the T&M Tickets tool, it is recommended that you enable this setting. If you do not, the summarized line item information from a T&M ticket will not be visible in a change event. See Create a Change Event from a T&M Ticket.
- Display Revenue ROM, Latest Price, Latest Cost and Over/Under Columns
- Click Save.
Maintain Budget Codes Across All Line Items in Sync
Change event line items associated with change orders will now be editable as long as the change order is also in an editable state. How are line items and budget codes updated across change objects?
When users update budget codes they will sync across linked change objects if those objects are also in an editable state.
- Navigate to the project's Change Events tool.
- Click Configure Settings .
- Check the box next to Maintain Budget Codes across all Line Items in sync.
- Click Save.
Note: This setting is NOT retroactive. Budget codes that were not matching between objects before enabling this setting will not automatically sync upon activation. Only budget codes changed after enabling this setting will sync between objects.
Allow Line Item auto-population of Budget Code, Vendor, and Contracts
This setting gives users the option to turn OFF the Change Event Line Item (CELI) pre-fill automation logic. This gives admins more control over data entry by preventing automatic population of fields such as Budget Code, Vendor, and Contracts.
- Navigate to the project's Change Events tool.
- Click Configure Settings .
- Scroll to the Line Items section.
- Check the box next to Allow Line Item auto-population of Budget Code, Vendor, and Contracts to turn the setting ON or OFF.
- Click Save.
Set Attachment Settings
Tip
These settings can be turned ON and OFF on your project by a user with 'Admin' permission on the Change Events tool. When the configuration settings are enabled, the system automatically attaches any documentation from the last RFQ response to new prime potential change orders and new commitment change orders when using the Bulk Actions menu to create change orders.
- Navigate to the project's Change Events tool.
- Click Configure Settings .
- Choose from these options to include RFQ attachments in new change orders:
- Copy attachments from RFQ response to Prime PCOs. Place a checkmark in this box to enable a setting that automatically includes the attachments from related RFQ response to a new prime contract change orders. See Create a Prime Potential Change Order from a Change Event.
- Copy attachments from RFQ responses to Commitment COs. Place a checkmark in this box to enable a setting that automatically includes the attachments from related RFQ response to a new commitment change order. See Create a Commitment Change Order from a Change Event.
- Click Save.
Configure the Budget ROM Settings
You can define the business logic that Procore users to automatically complete the 'Rough Order of Magnitude' value of a budget change. If the budget view assigned to a project includes the 'Budget ROM' column, the value is automatically populated in that project's budget when users create and edit budget changes. See Create Budget Changes).
- Navigate to the project's Change Events tool.
- Click Configure Settings .
- Scroll to the Budget ROM section.
- Choose Latest Cost, Latest Price, or None from the following drop-down lists to define how the budget change feature handles the 'Scope' setting for a change event in your project's budget:
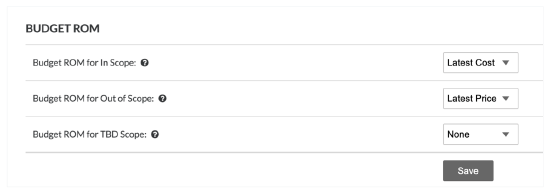
- Budget ROM for In Scope. This drop-down list applies your selected setting to changes that are marked 'In Scope'.
- Budget ROM for Out of Scope. This drop-down list applies your selected setting to changes that are marked 'Out of Scope'.
- Budget ROM for TBD Scope. This drop-down lists applies your selected setting to changes that are marked 'TBD' (to be determined).
- Click Save.
Prevent Budget Changes and Prime Change Orders on the Same Change Event Line Item
This setting will only become available when your company account has Budget Changes turned 'ON'.
Turn this setting 'ON' to prevent Change Event line items from having both a revenue impact and budget impact. When this setting is turned 'ON', a Change Event Line Item cannot have a Budget Change and Prime Contract Change Order associated at the same time.
- Navigate to the project's Change Events tool.
- Click Configure Settings .
- Scroll to the Budget Changes section.
- Check the box next to Prevent Budget Changes and Potential Change Orders on the Same Change Event Line Item.
- Click Save.
Add Estimated Markup to All of the Change Events on a Project
- Navigate to the project's Change Events tool.
- Click Configure Settings .
- Click Copy to Existing Change Events to copy the markup settings from the default Prime Contract (This is the first Prime Contract on your project when sorted by number then title).
- Click Confirm.
NoteS
- Markup is calculated using the Revenue ROM values based on the markup settings defined for the prime contract. See Add Financial Markup to Prime Contract Change Orders.
Edit Financial Markup (Vertical) Estimate on a Change Event
Note: A Prime Contract for Markup Estimates must be selected on a change event before markup can be edited on individual line items. See Add Estimated Markup to a Single Change Event.
- Navigate to the project's Change Events tool.
- Locate the change event with the financial markup (vertical) to be edited and click its number to view the change event.
- Click the value being edited in the markup section of the change event.

- Click Manual markup and enter a new markup amount.

- Changes are saved automatically once you click outside of the experience.
Important notes!
- If you manually enter a markup value, it will no longer stay updated with the prime contract's markup settings.
-
To reapply the contracted financial markup to the change event line items, the user must remove the current financial markup from the change event then complete the steps list here: Add Estimated Markup to a Single Change Event.
-
Creation of Prime Contract Change Orders from Change Events with Edited Markup
- When users create a Prime Contract Change Order from a change event with the edited financial markup, the Prime Contract Change Order will inherit the edited financial markup percentages entered on the change event.
- Only vertical markup can be edited on a change event
- There are some scenarios where edited financial markup in change events will not be able to pass to the Prime Contract Change Order due to complexity and the possibility of conflicting markup rules and logic.
- In the following scenarios, the user will have to edit the change order markup in the Prime Contract Change Order Schedule of Values.
Note: Edited markups will remain in the change event, but the new Prime Contract Change Order will use the selected prime contract markup rules- When multiple change events are used to create a change order.
- When adding change event line items to an existing Prime Contract Change Order with markup logic already applied
- Creating a new Prime Contract Change Order from a change event where the selected prime contract conflicts with the change events 'Prime Contract for Markup Estimates' field
Set User Permissions
- Navigate to the project's Change Events tool.
- Click the Configure Settings icon.
- Set the access permission level for the tool's users by clicking the icon in the desired column so a GREEN checkmark appears.
The color-coded icons in the user permissions area denotes the user's access permission level to the tool. To learn more, see What are the default permission levels in Procore?
Icon Colour Header Column 3 
GREEN The user has been granted this level of access permission to the tool. 
RED The user has NOT been granted this level of access permission to the tool. 
GREY The user is either (1) a Procore Administrator or, (2) has been granted access permission to the Procore tools on this project using a permission template (see What is a permissions template?). To change the user's access permission level, follow the steps in Manage Project Permissions Templates.