Complete Subcontractor Invoices with DocuSign®
For Procore Customers in the United States
 When your company applies the 'Owners English' or 'Specialty Contractors English' point-of-view dictionary, you'll see different tool names and term changes in the user interface. Learn how to apply the dictionary options.
- To learn the differences: Show/Hide
Objective
To complete the electronic signature process for a subcontractor invoice using the Procore + DocuSign® integration.
Background
After a project team member or your downstream collaborator creates a subcontractor invoice for a commitment, Procore users with a DocuSign® account can prepare a DocuSign® envelope for the invoice to send to the appropriate recipient(s) to request a signature.
Things to Consider
- Required User Permissions
- Additional Information:
- Once you log into your DocuSign® account from Procore, you will NOT need to sign in again until the login token expires. Once expired, the 'Re-Authentication Required' banner appears in Procore. To learn more, see What do the different DocuSign® banners in Procore mean?
- To complete the steps below, the invoice must be in Approved, Approved as Noted, or Pending Owner Approval status.
Prerequisites
- Create a subcontractor invoice using one of these options:
- Assign an 'Invoice Contact' to the commitment associated with the invoice. See Add Invoice Contacts to a Purchase Order or Subcontract.
- Place the invoice into the Approved, Approved as Noted, or Pending Approval status. See What are the default statuses for Procore invoices?
Steps
- Send a Subcontractor Invoice to DocuSign® or Bulk Send Subcontractor Invoices to DocuSign®
- Log in to DocuSign®
- Prepare the DocuSign® Envelope
Send a Subcontractor Invoice to DocuSign®
This step shows you how to open a subcontractor invoice in Procore.
- Navigate to the project's Commitments tool.
- Under the Contracts tab, do the following:
- In the 'Contracts' table, locate the subcontract that contains the invoice to sign.
- Click the Number link to open the subcontract.
- In the subcontract, click the Invoices tab.
Note
To send a subcontractor invoice to DocuSign®, it must be in one (1) of these statuses: Approved, Approved as Noted, or Pending Owner Approval. - In the Invoices (Requisitions) table, locate the invoice and click View.
- Review the invoice and make any edits as needed.
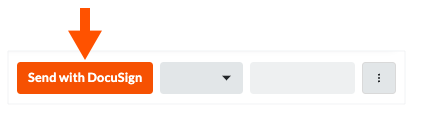
- When you are ready to send the invoice to DocuSign©:
BETA If you are using the beta subcontractor invoice experience, click Send with DocuSign at the top of the page.
LEGACY If you are using the legacy subcontractor invoice experience, click Update & Set Up DocuSign at the bottom of the page.

Bulk Send Subcontractor Invoices to DocuSign®
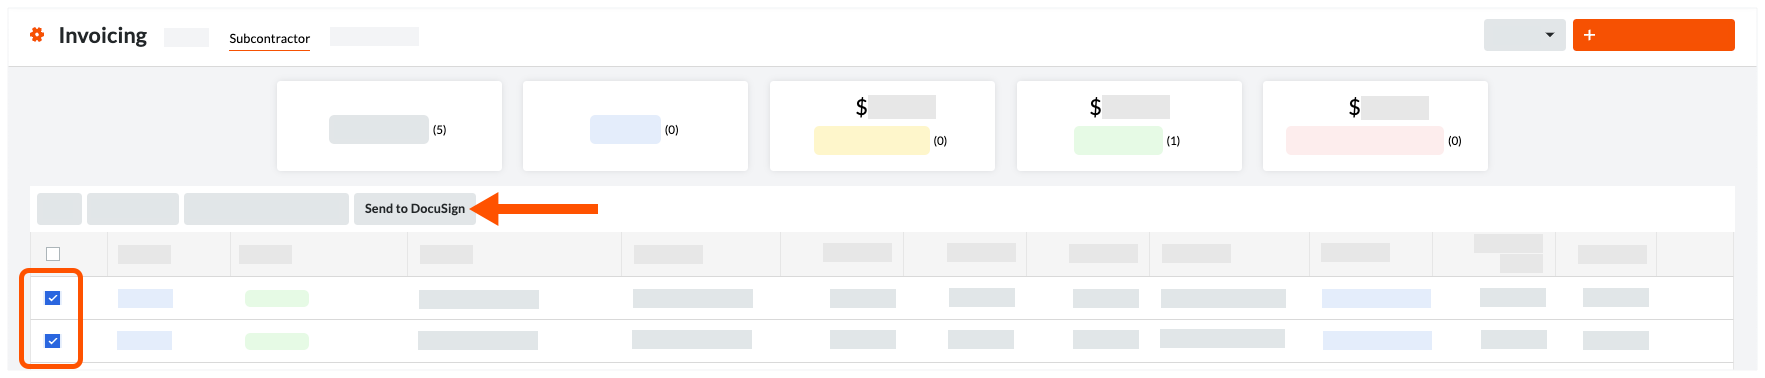
If you have 'Admin' level permissions on the project's Commitments tool, you can also use the project's Invoicing tool to send invoices to DocuSign® in bulk.
- Navigate to the project's Invoicing tool.
- Click the Subcontractor tab.
- Mark the checkboxes next to the invoices to bulk send to DocuSign®.
Note
To send a subcontractor invoice to DocuSign®, it must be in one (1) of these statuses: Approved, Approved as Noted, or Pending Owner Approval. See What are the default statuses for Procore invoices? - Click Send to DocuSign®.
Note
If the Send to DocuSign® button is grayed out and unavailable, hover your mouse cursor over the button. A tooltip appears to inform you of the reason. Typically, it is because the purchase order or subcontract does not have an 'Invoice Contact' assigned to it. See Add Invoice Contacts to a Purchase Order or Subcontract.
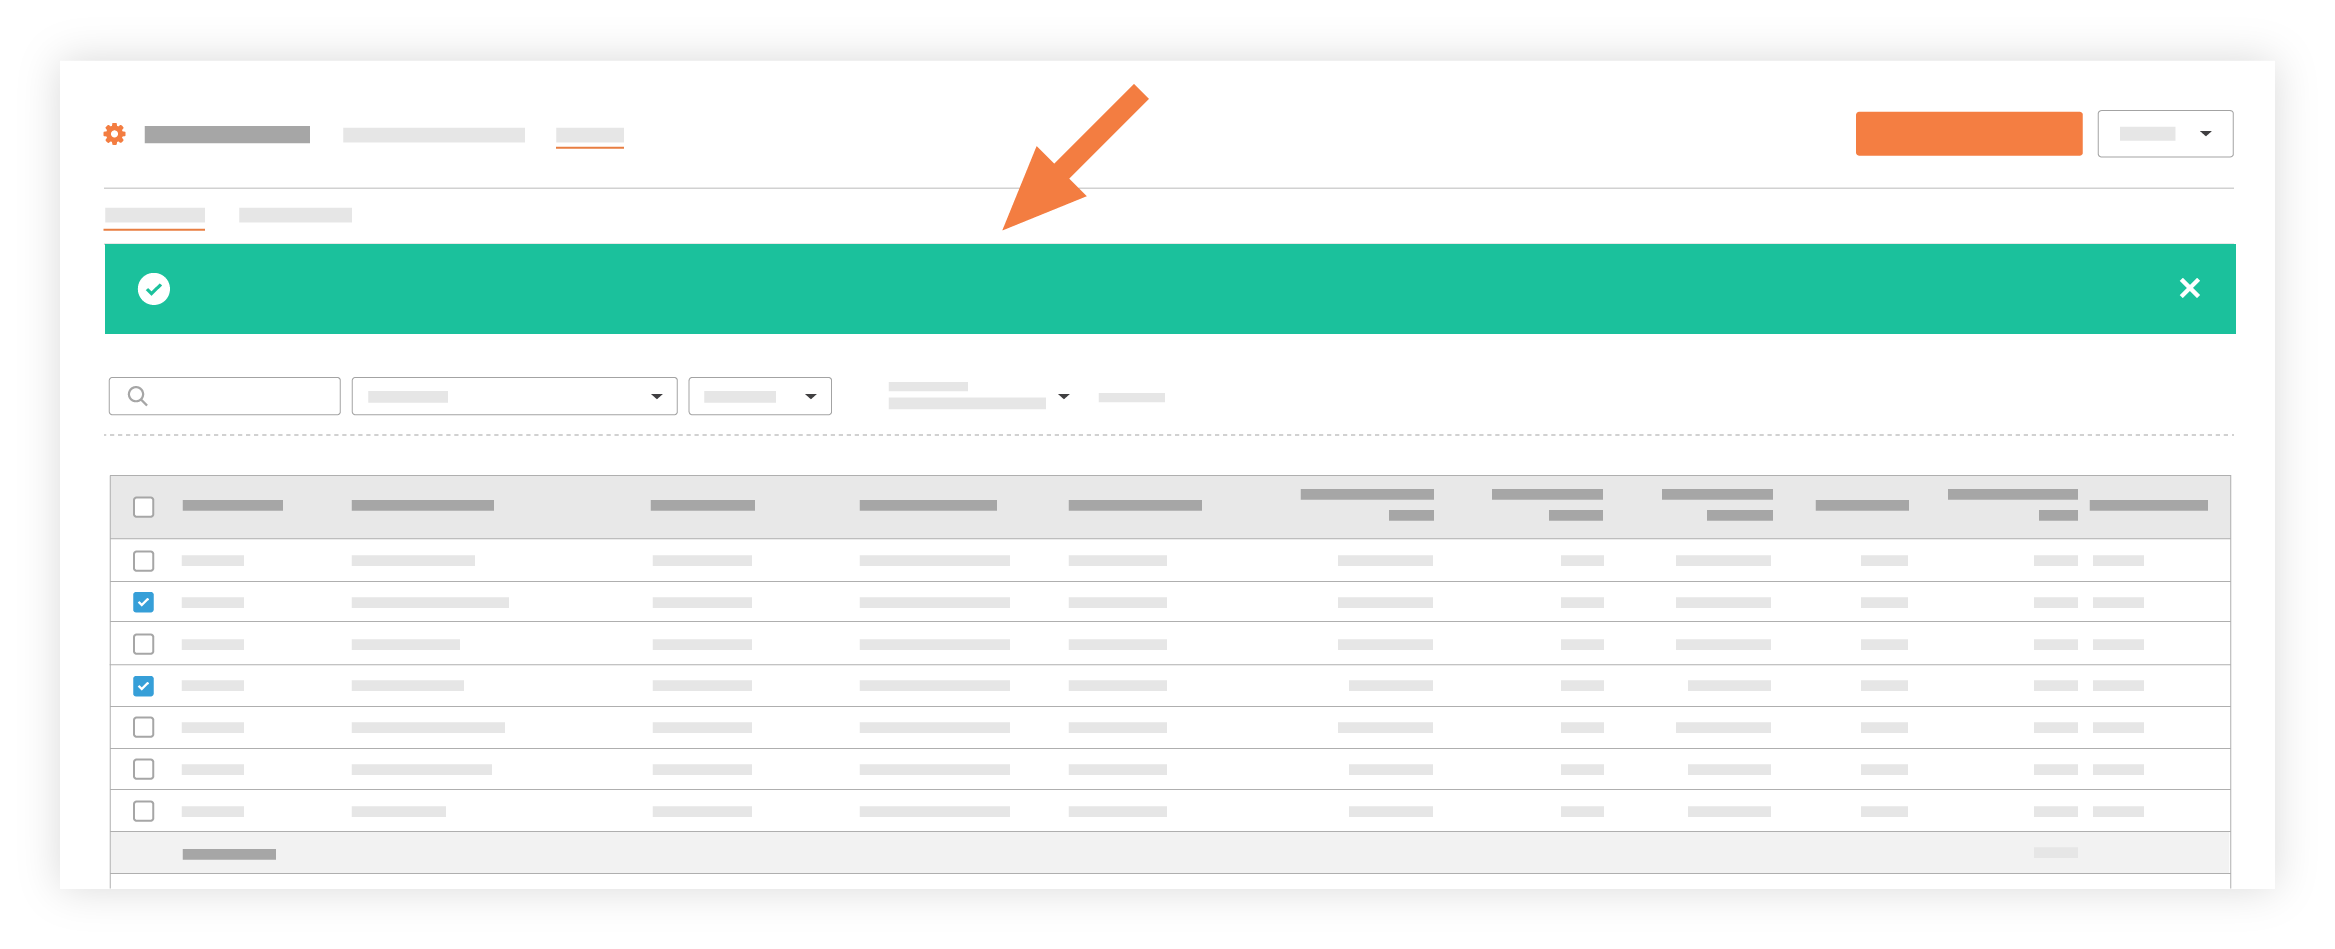
Procore sends the selected invoices to DocuSign®. A GREEN success banner appears at the top of the page when complete.Notes
- When sending invoices in bulk, the DocuSign® integration only sends invoices to the individuals listed as 'Invoice Contact(s)' on the contract in Procore.
- Some DocuSign® features are NOT available when using the bulk send option. For example, adding or removing documents, adding recipients, and so on.
- To use the unavailable DocuSign® features, follow the steps in Complete Subcontractor Invoices with DocuSign®.
Log in to DocuSign®
Prepare the DocuSign® Envelope
Once you are logged into the DocuSign®, the 'Upload a Document and Add Envelope Recipient' page appears. Complete these steps:
- Add Documents to the Envelope
- Add Recipients to the Envelope
- Add a Message to All Recipients
- Preview the Signature Fields & Send the Envelope
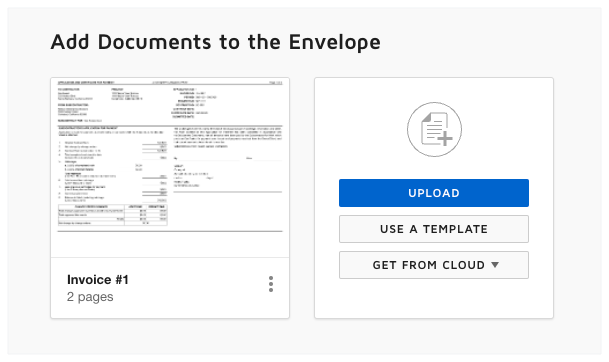
Add Documents to the Envelope
The following Procore information automatically populates the DocuSign® envelope:
- A PDF copy of the invoice is automatically added to the 'Add Documents to Envelope' section.
- The required signature boxes for each 'Role' on the invoice. For example, the General Contractor or Subcontractor whose contract is affected by the invoice. This includes each users 'Name' and 'Email Address.' See Add Recipients to the Envelope below.
You have the option to add other documents as follows:
- Optional: If you want to add additional documents to the envelope, choose one of the available options under the 'Add Documents to the Envelope' section:
Note
The available options in the 'Add Documents to the Envelope' section are developed and maintained by DocuSign®. To learn how to use DocuSign®, Procore recommends reviewing the content on support.docusign.com.- Upload
- Use a Template
- Get From Cloud
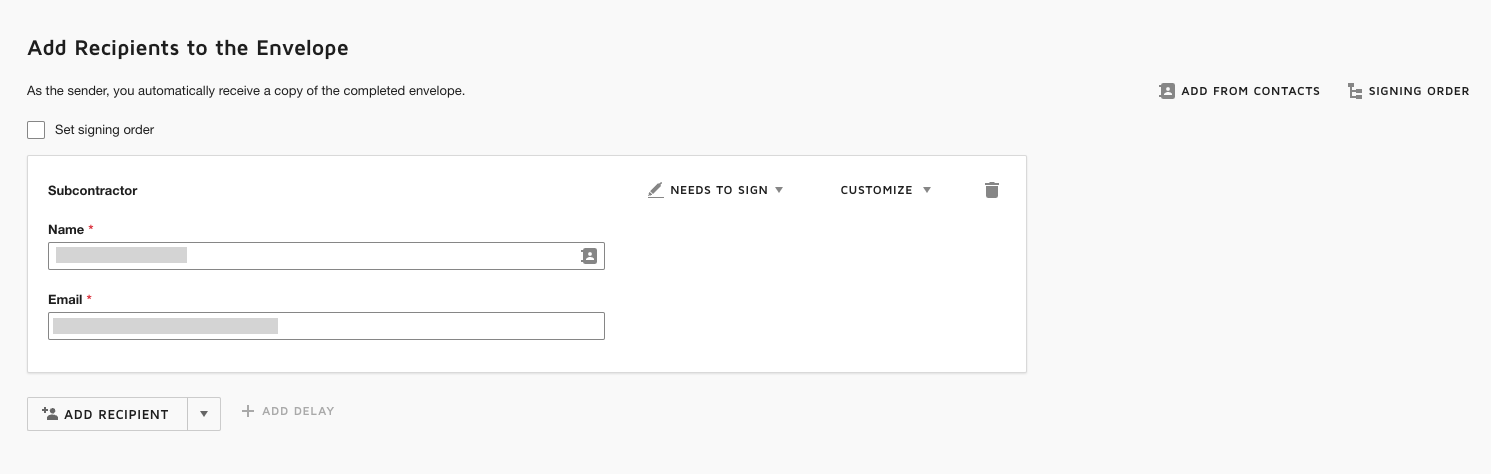
Add Recipients to the Envelope
To add recipients to the envelope:
- Under 'Add Recipients to the Envelope', keep the default recipient blocks, their names, and their email addresses. This data is added to the envelope automatically by the Procore+DocuSign® integration. If the data was specified in Procore, the values in the 'Name' and 'Email Address' fields of the recipient blocks correspond to these fields in Procore:
- Subcontractor. This is the individual designated in the 'Architect/Engineer' field of the commitment associated with the subcontractor invoice.
- General Contractor. This the individual who is designated in the 'Primary Contact' field in the Project Directory for the company designated in the 'Contractor'' field of the commitment associated with the subcontractor invoice.
Add a Message to All Recipients
Preview the Signature Fields & Send the Envelope
The next step is to preview the signature fields on the PDF. The signature fields correspond to the roles in Procore. For example, the General Contractor and Subcontractor who are parties to the contract with the invoice. These fields are automatically added to the DocuSign® envelope by the Procore + DocuSign® integration.
- Scroll to the bottom of the invoice PDF to view the signature fields. An example is pictured below.
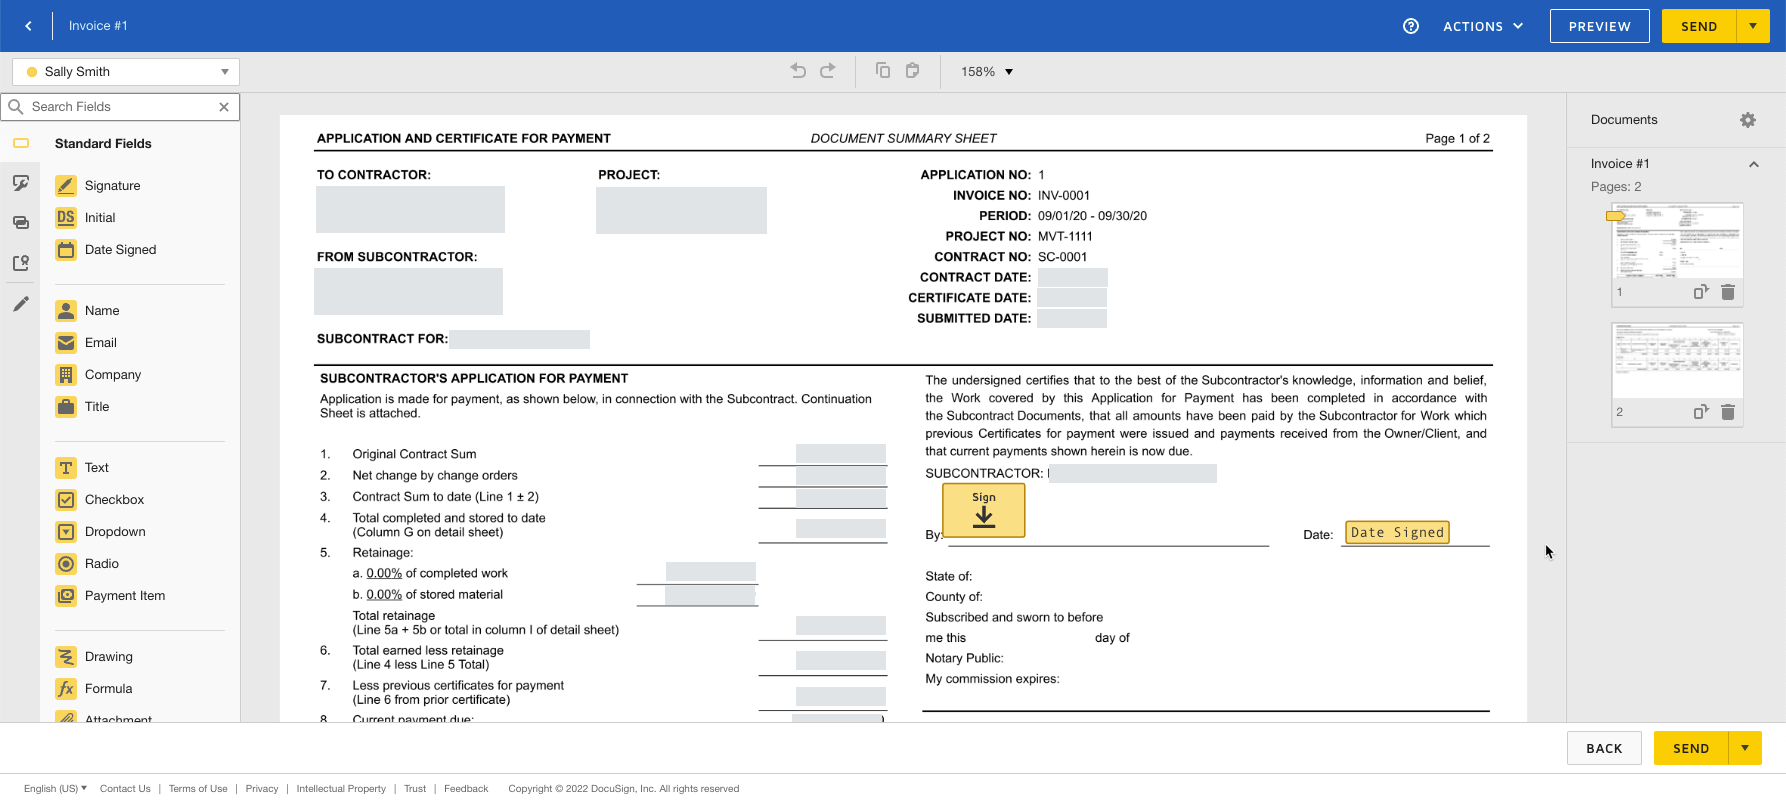
- Keep the existing signature fields. These fields are automatically populated by Procore and keeping them in their default positions ensures the signature workflow for the Procore application functions as expected.
- Optional: Add any 'Standard Fields' to the form as desired.
Note
The options in the 'Standard Fields' area are developed and maintained by DocuSign®. To learn how to use DocuSign®, Procore recommends reviewing the content on support.docusign.com. - When you are ready to collect the specified signatures, click Send.
DocuSign® sends the envelope to the specified recipients. Recipients can then continue with the Next Step.Tip
Are you manually changing the status to 'Out for Signature' after sending it to DocuSign®? If you decide to change the invoice's status to 'Out for Signature' in Procore after sending the invoice to DocuSign® (remember, you can only send invoices to DocuSign if they are in the Approved, Approved as Noted, or Pending Owner Approval status), you will need to manually change the invoice status in Procore back to the appropriate approved status after the DocuSign® signature process is complete.