Configure Settings: Invoicing
For Procore Customers in the United States
 When your company applies the 'Owners English' or 'Specialty Contractors English' point-of-view dictionary, you'll see different tool names and term changes in the user interface. Learn how to apply the dictionary options.
- To learn the differences: Show/Hide
Objective
To configure settings for the Invoicing tool as an invoice administrator.
Background
An invoice administrator should configure the Invoicing tool settings before your team members create any invoices on a Procore project.
Things to Consider
Steps
- Navigate to the project's Invoicing tool.
- Click Configure Settings
 .
. - Under Settings, configure the options.
Default Billing Period
These settings populate the date fields in the 'Set Up Billing Period' prompt when users Create Manual Billing Periods with the Invoicing Tool.
Tip
Want to simplify billing period creation for future cycles? An invoice administrator can configure default billing period dates to preset the dates in the From, To, and Due Date fields in the 'Set Up Billing Period' prompt. See Create Manual Billing Periods with the Invoicing Tool. If you don't complete this configuration, no preset dates show. Instead, you will see: mm/dd/yyyyTo configure the Default Billing Period settings:
- Choose these dates:
- Start Date. Accept the default start date of '1st of the month' or choose a different date. This populates the 'From' date in the prompt.
- End Date. Accept the default end date of '31st of the month' or choose a different date. This populates the 'To' date in the prompt.
- Due Date. Accept the default due date of '25th of the month' or choose a different date. This populates the 'Due Date' field in the prompt.

-
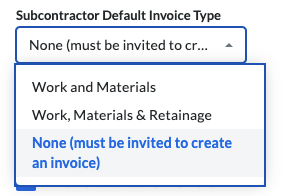
Select a Subcontractor Default Invoice Type option from the drop-down list:
- Work and Materials. Allow invoice contacts to create invoices to bill for work and materials.
- Work, Materials & Retainage. Allow invoice contacts to create invoices to bill for work, materials, and retainage release.
- None (must be invited to create an invoice). Only allow invoice contacts to create invoices after sending an 'Invite to Bill'.
Note
The 'Invoice Type' is always set to 'Work, Materials & Retainage' when a user with 'Admin' level permissions on the Commitments tool creates a new invoice.
- Click Update.
Lien Waivers
General Availability in Select Markets (United States)
Procore Pay These settings are only available with Procore Pay. For instructions:
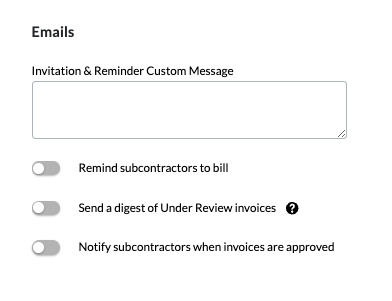
Emails
Use these settings to adjust the Invoicing tool's email messages.
To configure the Emails settings:
- Type a message for your invoice contacts in the Invitation & Reminder Custom Message box.
Tip
Where is this text used? Procore includes this text in the 'Invite to Bill' and automatic reminder emails. See Send an 'Invite to Bill' to an Invoice Contact. - Move the toggle to the right to turn an option ON. Move it to the left to turn it OFF. The default setting for these options is OFF:
- Remind subcontractors to bill. Turn ON to send automatic email reminders to invoice contacts. You can set the email frequency—Every day, Every 2 days, or Every 3 days from the Subcontractor Reminder Frequency drop-down list. Procore stops sending reminders after the due date. The system sends the first reminder to bill after the subcontractor is invited, based on your configured frequency.
- Send a digest of Under Review invoices. Turn ON and select Weekly from the Under Review Digest Frequency drop-down list to send a weekly digest summary every Monday. Invoices for the current billing period are included in this digest message when they are in the Draft, Under Review, or Revise and Resubmit status. Digest messages are sent to members of the 'Invoice Distribution' drop-down list, located in the Default Distributions section of the Configure Settings page in the Commitments tool. See Configure Settings: Commitments.
- Notify subcontractors when Invoices are approved. Turn ON to automatically send an email notification to invoice contact(s) when an invoice's status is changed to Approved or Approved as Noted by an invoice administrator. See Review a Subcontractor Invoice as an Invoice Administrator.
- Click Update.
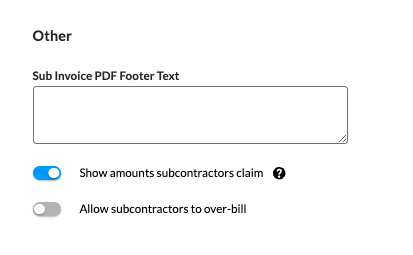
Other
Use these settings to configure the system's behavior for subcontractor invoices:
To configure the Other settings:
- Optional: Sub Invoice PDF Footer Text. Enter the footer text for the exported invoice PDF. See Export a Subcontractor Invoice. This field is useful for adding information about local regulations and compliance statements.
Note
The 'Sub Invoice PDF Footer' text only appears when a user with 'Admin' level permissions on the project's Commitments tool generates the PDF. It does NOT appear on any PDF generated by a user with 'Read Only' or 'Standard' level permissions on the Commitments tool. - Optional: Show Amounts Subcontractors Claim. If you enable this setting, general contractors can differentiate between what a subcontractor claims and what the general contractor approves.
Note
In Australia and New Zealand, enabling the 'Show Amounts Subcontractors Claim' setting will also let general contractors create a payment schedule PDF in response to the invoice. See Review a Subcontractor Invoice as an Administrator and Create a Payment Schedule.- Total Claimed Amount. This reflects the 'Proposed Amount' column on the invoice's Detail tab. It excludes retainage.
- Total Approved Amount. This reflects the 'Work Completed this Period' plus 'Materials Presently Stored' on the invoice's 'Detail' tab. This value also excludes retainage.
- Reasons for Difference. When there is a difference between the claimed and approved amounts, include those reasons here. See Review a Subcontractor Invoice as an Invoice Administrator.
- Allow Subcontractors to Over-Bill. Choose the appropriate option:
Tips
- How does this setting work? See How do I prevent or allow overbilling on a subcontractor invoice?
- Want to prevent overbilling on all of your company's Procore projects? A Procore Administrator can turn the 'Prevent Overbilling on All Projects' setting ON in the Company Admin tool. This prevents users from saving an invoice if any of the invoice's line items exceed 100% of the budgeted amount in the commitment on all of your company's Procore projects. See Set the Defaults for Your Projects. When ON, users can't change the 'Allow Subcontractors to Over-Bill' setting on a project.
- To prevent over-billing. Move the toggle to the left to turn the option OFF. This prevents users from saving an invoice if any of the invoice's line items exceed 100% of the budgeted amount in the commitment on this Procore project.
OR - To allow over-billing. Move the toggle to the right to turn the feature ON. This is the default setting. This setting prevents users from saving an invoice if any of the invoice's line items exceed 100% of the budgeted amount in the commitment on all of your company's Procore projects.
- Click Update.
Beta Subcontractor Workflow Settings
These settings are only available if your company enables the Workflows tool and assigns a workflow template to the project. See Assign a Custom Workflow Template to a Project. See Configure a Custom Workflow Template for Subcontractor Invoices on a Project.
Beta Owner Invoicing Workflow Settings
These settings are only available if your company enables the Workflows tool and assigns a workflow template to the project. See Assign a Custom Workflow Template to a Project. See Best Practices for Creating an Owner Invoice Workflow (Beta).