Objective
To add items to a transmittal using the project's Transmittals tool.
Things to Consider
- Required User Permissions:
- To edit an existing transmittal, 'Admin' level permission on the project's Transmittals tool.
- To add items when creating a transmittal, 'Standard' level permission or higher on the project's Transmittals tool.
- Additional Information:
- If you want to attach a PDF or other document attachment to a transmittal, you can do so when you select one of the following from the 'Format' drop-down list under items: Documents, Plans, Prints, Samples, or Shop Drawings.
Background
The Transmittals tool lets you keep a record of project information that has been sent to others via fax and shipping. When you create and send a transmittal, all of the transmittals information is captured and stored with your Procore project, including the names of the sender, recipient and relevant dates. For example, perhaps a user's email system is down and the only way to send an official response is via fax or a phone call. In such cases, transmittals can be used to properly keep track of these correspondences inside of Procore for historical record and audit purposes.
Steps
- In the New Transmittal page, scroll down to the Items area.
- Select an item from the Format drop-down list.
Notes:
- You can add multiple items to a transmittal.
- When adding items to a transmittal, the system lets you attach multiple files at once for these formats: Documents, Plans, Prints, Samples, and Shop Drawings. See How do I attach multiple files at once to a transmittal?
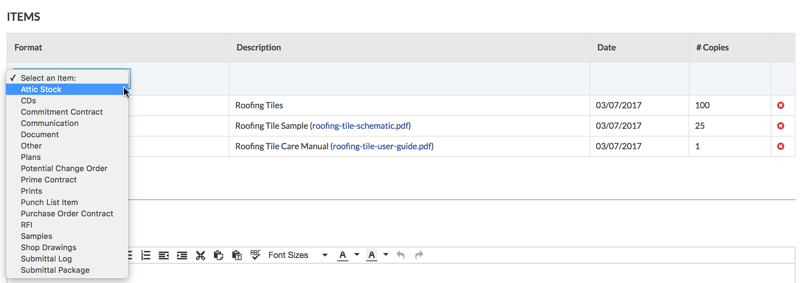
Depending on the Procore tools that are enabled in your environment, you may have these options:
-
Attic Stock: Select this option to create a transmittal for any attic stock Then enter a description, select a date from the calendar, and enter the number of copies.
-
CDs: Select this option to create a transmittal for a compact disc. Then enter a description, select a date from the calendar, and enter the number of copies.
-
Commitment Contract: Select this option to create a transmittal for subcontract (see Create a Subcontract). Next, select a subcontract from the Description list, the date of the subcontract is captured automatically, and then enter a number of copies.
-
Communication: Select this option to create a transmittal for an email message in the project's Emails tool.
-
Document: When you select this option, the system prompts you to select a document from the project's Documents tool.
-
Other: To create a different type of submittal, select this option. Then enter a description, select a date from the calendar, and enter a number of copies.
-
Plans: Select this option to create a transmittal for any construction plans. Then enter a description, attach any files to the item, select a date from the calendar, and enter a number of copies.
-
Potential Change Order: When you select this option, the system prompts you to select a potential change order from the project's Prime Contracts tool.
-
Prime Contract: When you select this option, the system prompts you to select a contract line item from the project's Prime Contracts tool.
-
Prints: Select this option to create a transmittal for prints. Next, enter a description of the print(s), attach a file of the print, select a date from the calendar, and enter a number of copies.
-
Punch List Item: When you select this option, the system prompts you to select a punch list item from the project's Punch List tool.
-
Purchase Order Contract: Select this option to create a transmittal for a purchase order (see Create a Purchase Order). Then select a purchase order from the Description list, the system sets the date automatically, and enter a number of copies.
-
RFI: When you select this option, the system prompts you to select an RFI from the project's RFIs tool.
-
Samples: Select this option to create a transmittal for a sample. Then type a description of the sample, attach a file to the item, select a date from the calendar, and enter a number of copies.
-
Shop Drawings: Select this option to create a transmittal for shop drawing. Then type a description of the shop drawing, attach a file to the item, select a date from the calendar, and enter a number of copies.
-
Submittal Log: Select this option to create a transmittal for a submittal. Then select a submittal from the Description list and specify the number of copies.
-
Submittal Package: When you select this option, the system prompts you to select a submittal package from the project's Submittals tool.
- Click Add.
Note: If you attached multiple files to the transmittal, each file is added as a separate line item.
- Repeat the steps above to add additional line items.
The illustration below shows you an example of a completed Items area.
Note: The system does NOT permit you to edit existing items. If you need to correct an item, click the RED 'x' to delete it. Then add the item again.

- Continue with Add Comments to the Transmittal.
 .
.