Create a Commitment Change Order from a Prime Contract Change Order
PROCORE SUPPORT: INTERNAL NOTES
With the release of field-initiated change orders and instead of using the steps below, Procore recommends that customers enable the Change Events tool and then follow the steps in Allow Collaborators to Submit Field-Initiated Change Orders (Beta). This allows the customer's collaborators to Submit a Field-Initiated Change Order as a Collaborator (Beta).
Other items to note:
- The steps below are NOT supported with Work Breakdown Structure.
- The steps below are only supported when the Change Events tool is turned OFF on the project.
Important
This tutorial is intended to be used by Procore users who have NOT enabled the Change Events tool on a project.Objective
To create a Commitment Change Order (CCO) from a Prime Contract Change Order (PCCO) or a Prime Contract Potential Change Order (PCO).
Background
If the project's Change Events tool is not enabled on your project, you can use the steps below to create a CCO from a PCCO or a Prime Contract PCO.
- One (1) Tier Change Orders:
- When the one (1) tier setting is configured on the Prime Contracts tool, the change management process starts with creating PCCO.
- When the one (1) tier setting is configured on the Commitments tool, you can start by creating a CCO.
- Two (2) or Three (3) Tier Change Orders:
- When the two (2) or three (3) tier setting is configured on the Prime Contracts tool, you will start by creating a Prime Contract PCO.
- When the two (2) or three (3) tier setting is configured on the Commitments tool, create a Commitment Potential Change Order (CPCO).
Things to Consider
- Required User Permissions:
- 'Admin' level permissions on the project's Prime Contracts tool.
- 'Admin' level permissions on the project's Prime Contracts tool.
- Additional Information:
- Use the steps below only when the Change Events tool is NOT active on the project. When the Change Events tool is active, follow the steps in Create a Commitment Change Order from a Change Event.
- After creating a potential change order, you can issue and approve a commitment change order from the potential change order.
- You can also compare the commitment change order to the corresponding potential change order line item and view any variance between them.
Important
The steps below describe how to create a commitment change order from a potential change order. However, you can also use the same steps when creating a commitment change order from a prime contract change order.Prerequisites
- Create a Prime Contract PCO and add at least one (1) SOV line item. See Create a Potential Change Order for a Prime Contract.
Steps
- Navigate to the project's Change Orders tool.
- Locate the potential change order that you want to work with.
- Click Edit.
- Click the Schedule of Values tab.
- Under 'Add Line Item,' do the following:
- Cost Code. Select a cost code from the drop-down list.
- Description. Enter a brief description of the change.
- Type. Select the contract type.
- Amount. Enter the amount.
- Click Add.
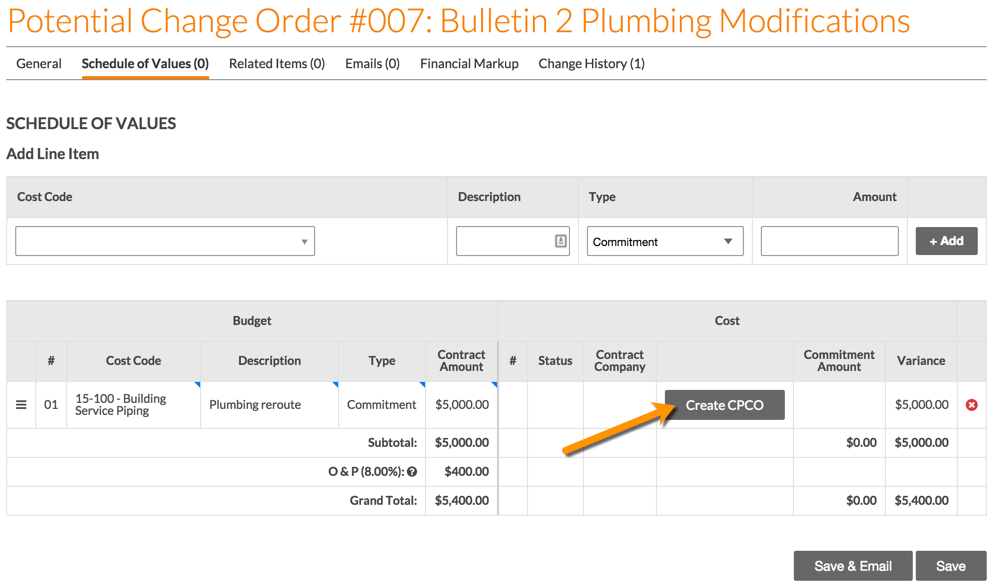
- Click Create CPCO.
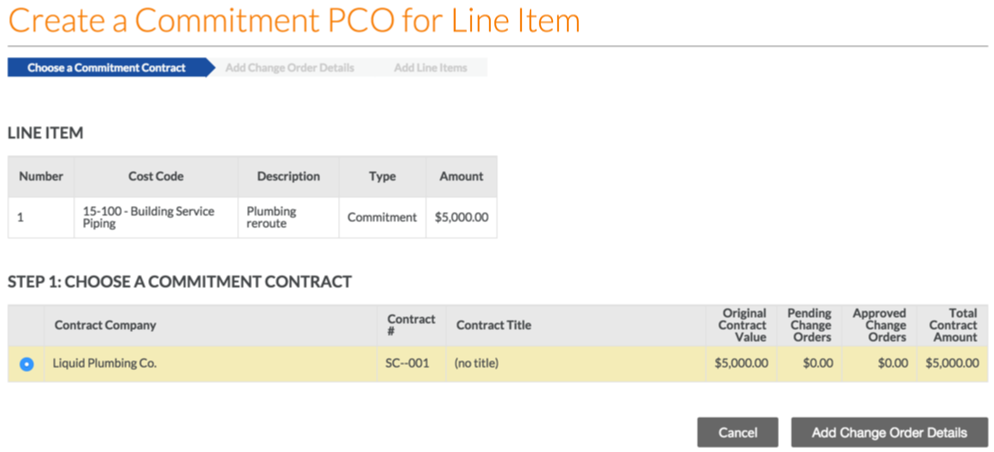
This opens the Create a Commitment PCO for a Prime Line Item page. - Under 'Step 1: Choose a Commitment Contract', choose the appropriate contract to associate that contract with the new Commitment PCO.
Note: If you need to create a new commitment, follow the steps in Create a Commitment.
- Click Add Change Order Details.
- Fill out the following information:
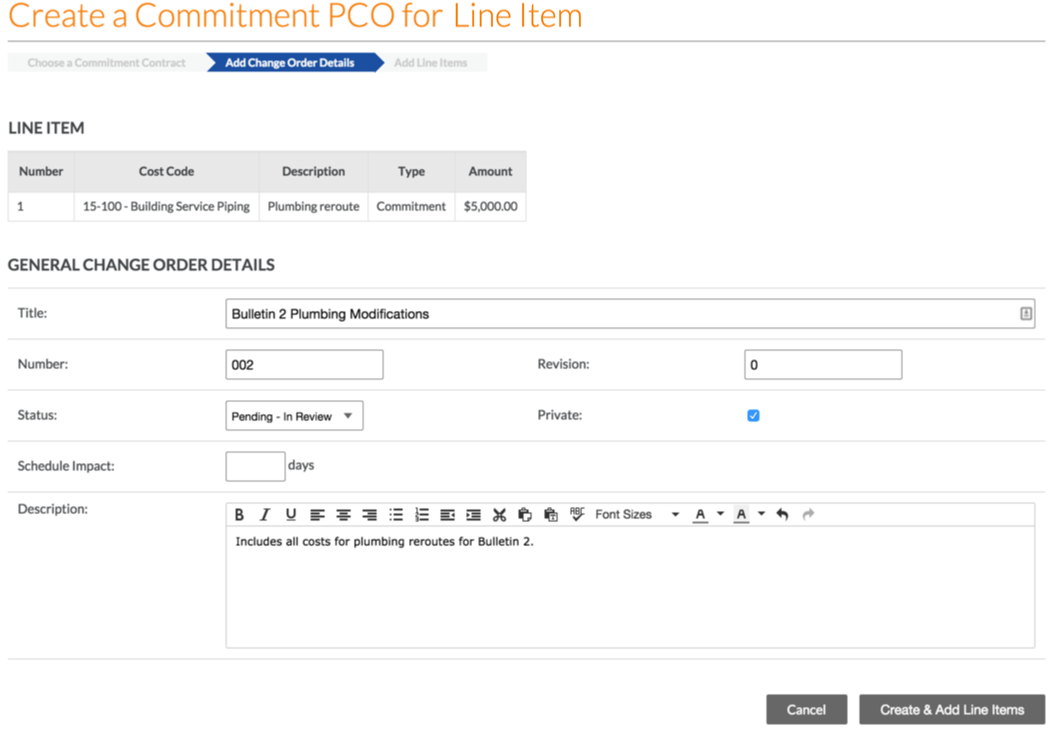
- Number: This field automatically populates based on the number of CCOs already created. By default, the number will automatically increment by one. However, you can manually enter a different number if desired. (Note: If you manually enter a number, the next CCO that's created will automatically increment by one, based upon this specific value.)
- Revision: This field displays the CCO's revision number. When a CCO is first created, its revision number is zero. A CCO could have multiple revisions because of feedback from a reviewer/approver.
- Title: The title field will populate with the name of the PCO that the CCO is tied to.
- Status: Select the current state of the CCO:
- Approved: The CCO still needs to be approved. Costs are reflected as "Committed Costs" in the budget.
- Draft: The CCO still needs to be modified before it can be submitted for review. Costs are not reflected in the budget.
- Pending - In Review: The CCO is currently being reviewed by an approver. Costs are reflected as "Pending Changes" in the budget.
- Pending - Revised: The CCO has been modified since its initial submission. Costs are reflected as "Pending Changes" in the budget.
- Rejected: The CCO has been rejected. costs are not reflected in the budget.
- Note: These statuses reflect the budget in the ways listed above for the Procore Standard Budget View. To create or modify views, see Set up a New Budget View.
- Private: If checked, the CCO will be visible only to 'Admin' users on the Commitments tool and 'Standard,' or 'Read only' that have specifically been given access to that Commitment.
- Change Reason: Select the reason for the potential change order, either Client Request, Design Development, Allowance, Existing Condition, Backcharge, or any options customized by the Company Administrator. See Set Default Change Management Configuration.
- Schedule Impact: Input the number of approved days to extend the contract, if any.
- Description: Enter a more detailed description of the CCO.
- Click Create & Add Line Items.
- Fill out the following line item information:
- Description: Enter a description for the line item.
- Amount: Enter in an amount for the line item.
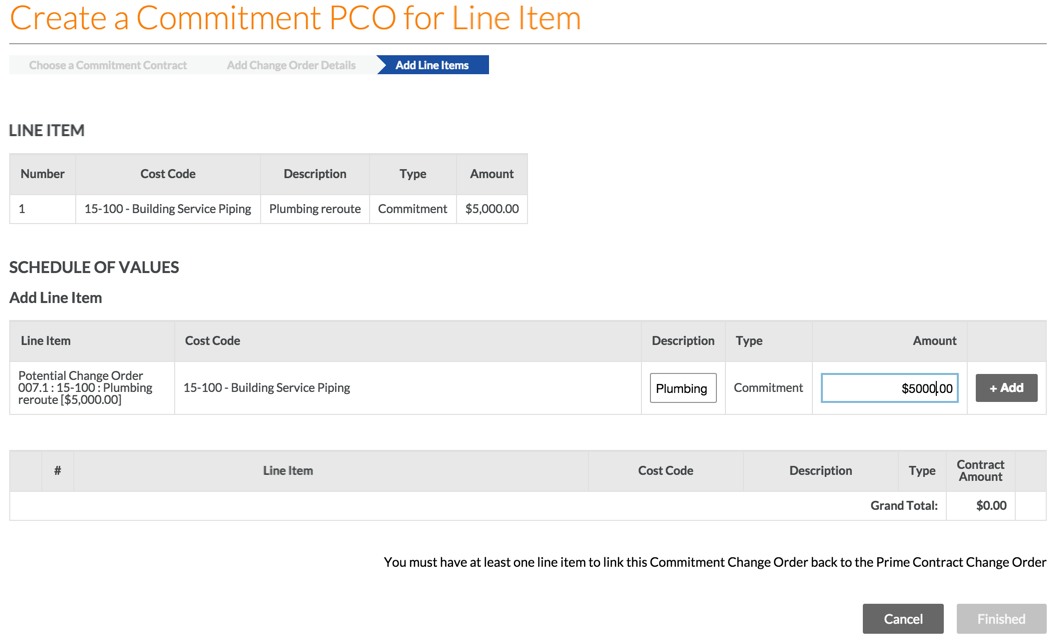
- Click +Add. If the combination of the sub job, cost code, and cost type are non-budgeted, a pop-up will appear asking to confirm you want to add this line item to the budget. If OK is selected, this line item will be added directly to the Budget with a "?" next to the line item. See Add a Partial Budget Line Item.
- If you are done creating the CCO, click Finished. If you want to add more line items to your CCO, repeat step #11 and click Finished when you are done.
If you would like to learn more about Procore's prime contract software and how it can help your business, please visit our construction contract management software product page  .
.