Send an 'Invite to Bill' to an Invoice Contact from the Progress Billings Tool
Objective
To send an 'Invite to Bill' for the current billing period to an invoice contact from the Progress Billings tool.
Background
Before you or an invoice contact can create a new subcontractor invoice, you must create a billing period using the project's Invoicing tool. After that, you can choose from these methods to create the invoice:
- To invite an invoice contact to create a new invoice for the current billing period
If you choose this method, use the steps below to send the invoice contact an 'Invite to Bill' by email. Sending an 'Invite to Bill' is a courtesy notification that reminds the invoice contact to create and submit the new invoice before the 'Due Date' specified by the billing period. To create the invoice as an invoice contact, see Submit a New Invoice as an Invoice Contact. - To create a new invoice for the billing period on behalf of the invoice contact
If you choose this method, follow the steps in Create a Subcontractor Invoice on Behalf of an Invoice Contact.
Example
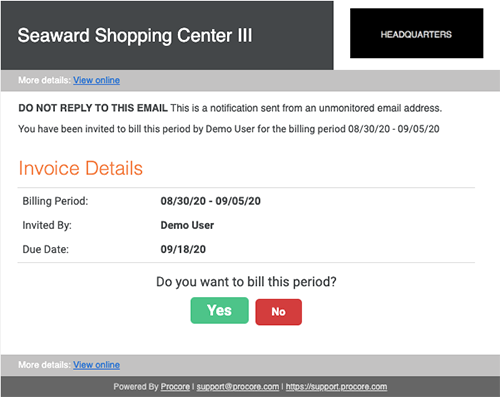
The illustration below shows an example of an 'Invite to Bill' that you can send to an invoice contact.

Things to Consider
- Required User Permissions:
- To send an 'invite to bill' to an invoice contact, 'Admin' level permissions on the project's Commitments tool
- Additional Information:
- If you do not want the invoice contract to create invoices in Procore, you can Create a Subcontractor Invoice on Behalf of an Invoice Contact
- If you want to create an invoice to release retainage. See Create a Subcontractor Invoice for the Release of Retainage.
Prerequisites
- Add an invoice contact using one of these Procore tools:
- Commitments. See Add Invoice Contacts to a Purchase Order or Subcontract.
OR - Progress Billings. See Add Invoice Contacts to a Purchase Order or Subcontract.
- Commitments. See Add Invoice Contacts to a Purchase Order or Subcontract.
- Create Manual Billing Periods or Create Automatic Billing Periods
Steps
- Navigate to the project's Progress Billings tool.
- Click the Subcontractor tab.
- Locate the purchase order(s) or subcontract(s) that you want to send an 'Invite to Bill' for from the list.
Notes
- To view only those invoices where an 'Invite to Bill' has not been sent, click Add Filter. Then choose 'Invoice Status' and mark the Not Invited checkbox.
- If you are creating a subcontractor invoice to release retainage, you do not need to send an 'Invite to Bill.' See Create a Subcontractor Invoice for the Release of Retainage.
- Mark the checkboxes that correspond to the contracts for the current billing period.
- To select all of the invoices, mark the checkbox at the top of the table.
- If the 'Send Invites' button is grayed out and you are NOT permitted to send invites when one or more of the selected commitments are in the following status:
- No Invoice Contacts. You must first assign an invoice contact to the commitment. See Add Invoice Contacts to a Purchase Order or Subcontract.
- SSOVs NOT Approved. The Subcontractor Schedule of Values (SSOV) must be in the 'Approved' state. See Enable or Disable the Subcontractor SOV Tab on the Commitments Tool.
- If the commitment contract's percentage complete is 100%, you cannot send an invite to bill.
Note
If today's date is after the billing period's 'Due Date', you will NOT be permitted to send an email invite.
- Click Send Invites.

After sending the invites, the following occurs:

- A success banner appears to confirm the invitation was sent.
- The contract is removed from the 'Not Invited' count to the 'Invited' count.
Tip
After the invoice contact completes the Next Step, the status of the invoice updates as follows:
- If the 'Invite to Bill' is accepted by the invoice contact, the status changes to 'Accepted'.
- If the 'Invite to Bill' is rejected by the invoice contact, the status changes to 'Declined'.
To learn more about statuses, see What are the default statuses for Procore invoices?


 When your company applies the 'Owners English' or 'Specialty Contractors English' point-of-view dictionary, you'll see different tool names and term changes in the user interface. Learn