Approve a Timesheet
Approve a Timesheet
Objective
To approve a timesheet in the project's Timesheets tool.
Background
Depending on your project's business process, your employees and workers might be responsible for submitting their own timecards and timecard entries or your foreman/superintendents may choose to create timecard entries on behalf of their crew. The next step is to verify the timesheet's data for accuracy and completeness. Typically, this first-tier approval is completed by a foreman or superintendent who changes the timesheet's status to 'Reviewed'.
The next tier in the approval process is for a project manager (or another project executive) to approve the entries to ensure readiness for payroll—Do the hours submitted look accurate? Was 'Overtime' applied properly? Are the hours logged to the appropriate cost code? The steps below show you how to approve a timesheet.
Things to Consider
- Required User Permissions
Tip
Wondering how to configure user permissions to best fit your business needs? For a more detailed explanation about user permissions and multi-tier approvals, see How do I configure user permissions for multi-tier approvals with timekeeping? - 'Approved' timecard entries:
- Can only be edited by a user with 'Admin' permissions on the Company level Timesheets tool.
- Cannot be deleted.
- Can only be marked as 'Completed' in the Company level Timesheets tool.
- 'Completed' timecard entries:
- Cannot be edited at the project level. See Edit a Time Entry in the Company Level Timesheets Tool and Edit Your Company's Timesheets in Bulk.
- If you see an 'Individual Entries' section on a timesheet, time was entered in the Company Timecard, Daily Log, or My Time tools and can be approved in the Company and Project level Timesheets tool.
Video
Steps
Approve a Timecard Entry
- Navigate to the project's Timesheets tool.
- Find the timesheet(s) that you want to approve. See Search and Filter Timesheets.
- Review the time entries line-by-line for accuracy and completeness.
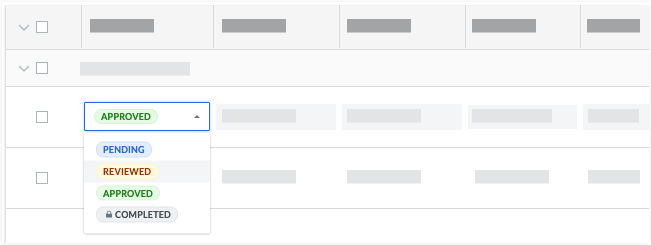
Note: To learn how to make changes, see Edit a Timesheet. - Click a cell in the Status column and select Approved from the drop-down list.
Note
Timecard entry status can only be changed to 'Completed' in the Company level Timesheets tool. See Approve a Timecard Entry in the Company Level Timesheets Tool.
- Repeat the steps above for each timecard entry on the timesheet until you've approved all of the entries on the timesheet.
- Continue with Approve a Timesheet below.
Approve a Timesheet
- Navigate to the project's Timesheets tool.
- Find the timesheet(s) that you want to approve. See Search and Filter Timesheets.
- If all your timecard entries are accurate and complete, click the Change Status button on the timesheet and select 'Approved'.
- Repeat the steps above for each timesheet.