Review a Timesheet
Review a Timesheet
Objective
To review the timecard entries on a timesheet.
Background
After you create a timesheet, you have the option to collect signatures from your field employees. See Sign a Timesheet (Android) and Sign a Timesheet (iOS). Next, you can begin reviewing your timesheets for accuracy and completeness.
Example
Because every construction company is different, the team members you choose to carry out your timekeeping process may differ from the roles and considerations in this example:
- Foremen, Superintendents, and other Supervisors. These are the team members who will create time card entries and timesheets on a project. At a minimum, you should provide these team members with 'Read Only' or 'Standard' level permissions on the Project level Timesheets tool and the 'Review & Edit Timesheets' granular permission on a project permission template. This allows these users to create new timesheets in the 'Pending' status and change the status of a timesheet to 'Reviewed' in the Project level Timesheets tool. They can also change the status from 'Pending' to 'Reviewed' on project timesheets that they have permission to view using the Company level Timesheets tool.
- Project Managers and other Administrators or Executives. These are the team members who will approve 'Reviewed' timesheets before handing them off to your accounting/payroll team for processing. At a minimum, you should provide these team members with 'Admin' on the Project level Timesheets tool. However, if they are responsible for monitoring timekeeping on multiple projects, you may wish to also grant them 'Admin' level permissions on the Company level Timesheets tool.
- Accounting, Payroll, and other Administrators or Executives. These are the team members who will mark timesheets 'Completed.' This capability is only available in the Company level Timesheets tool, so you should assign these users 'Admin' level permissions on both the Project level Timesheets tool. This allows users to access the Company level Timesheets tool. It also allows users to see project data in the Company level tool.
Things to Consider
- Required User Permissions
- Some fields can be configured as required, optional, or hidden for timecard entries created with the Project level Timesheets tool. See Which fields in the Timesheets tool can be configured as required, optional, or hidden?
Tip
Need to edit a timecard entry? See Edit a Timesheet.Steps
Review a Timecard Entry
- Navigate to the project's Timesheets tool.
- Find the timesheet(s) that you want to review. See Search for and Filter Project Level Timesheets.
- Review the time entries line-by-line for accuracy and completeness.
Note
Editing the fields in a timecard entry requires specific user permissions and, if your company's Procore Administrator has assigned a configurable fieldset to the Project level Timesheets tool, you may also be prompted to enter any required field data that is missing. For details, see Edit a Timesheet
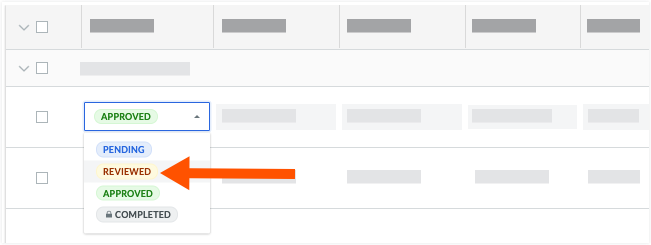
- Change the status to 'Reviewed' by clicking the Status bubble on each timecard entry. A GREEN banner confirms your update.
- Repeat the steps above for all of the timecard entries.
- Continue with Review a Timesheet below.
Review a Timesheet
- Navigate to the project's Timesheets tool.
- Find the timesheet(s) that you want to review. See Search for and Filter Project Level Timesheets.
- Review the time entries line-by-line for accuracy and completeness.
Tip
Need to edit a timecard entry? See Edit a Timesheet. - Click the Change Status button and select 'Reviewed' from the drop-down list.
- Repeat the steps above for each timesheet.
Next Steps
- Approve a Timesheet